Spriting Tutorial
By: Gauntlet
 Recently there has been allot of questions by people on how to sprite. While it is fairly obvious to me, allot of people have asked for a tutorial and I figured why not? Please understand that I make NO claims to be a great spriter, nor do I wish to be. I just know how it's done. All of these sprites can be made in any paint program. You don't need anything fancier than MS Paint.
Allot of other people go into actually using Paint and the subtleties of the Frankenstein, but ...... if you can't grasp the basics after reading my tutorial I don't think you'll have much of a future spriting. It's not complicated. You zoom into an existing sprite, change some stuff, and then yer done. Practice and you'll get better. If you still need tutorials after reading through this one then you're over thinking things. Really, it is that simple, but if it helps you get started read on and I'll give you the basics on making your very own shiny new sprites.
Chapters:
Pre-sprite 1: How to make a sprite sheet
Pre-sprite 2: How to make a GIF file
Type #1 - the recolour
Type #2 - the remake
Type #3 - the totally original
Type #4 - the fancy animation
Shading and High Contrast
"So, what does 32-bit Actually MEAN, Anyway??"
The Spriter's Code
FAQ
Pre-sprite 1: How to make a sprite sheet
By popular demand (and by popular, I mean people who ask on the forum constantly) this guide will cover how to make your very own sprite sheets. Going over capturing methods and sumsuch.
1. Pick a game. Like ..... Power Battles.
2. Find what you want to get. Maybe some head turning frames.
 3. Disable all the layers. You should end up with a screen that look a little like this. The way to do this is different for all emulators, so read the readme file.
4. Now, this is where things can go either of two ways. Either you can press whatever button is needed a billion times to capture every frame in the animation you want (like the old days) or you can use a handy program called AnimGet. AnimGet takes a screenshot every time the screen changes and then dumps all the pictures it takes into a folder. Be careful though, as this causes one HUGE amount of data to be used. The program itself is fairly straight forward.
5. Sift through all the images. There's no easy way to do it, so sort through them all and get the ones you want.
 6. Put the sequence you want in Paint or Adobe. I like to use a line on the bottom to make sure everything looks neat and tidy. Remember to use a colour not used in the sprite for the background since you'll want this to be a transparent gif file.
 7. Erase the line and make the file into a gif.
Pre-sprite 2: How to make a GIF file
First off, Paint makes LOUSY gif files. You'll probably have to get a separate program for it such as Animagic or GIF Construction set Professional or Adobe. How to create transparencies differ between programs, so I won't go into it.
Secondly, to actually make your sprite I suggest going in Paint. Using programs like Adobe Photoshop is allot like using an elephant gun to kill a fly - unnecessary and ultimately harder. It's good for quick recolouring and sometimes shading if you're feeling lazy, but Paint is quicker.
Thirdly, don't make your sprites in any other format than gif. Why anyone would want to is beyond me, but I'll go through the most common non-gif files which I find really annoying. JPEG - Great for images, lousy for sprites. You need every pixel you got in a sprite and you can't afford to waste it. What JPEG files do is lose information. In a large picture you don't really notice so much but in the smaller pictures (ala: sprites) the detail gets fuzzy and it becomes an eyesore. BMP - sure, BMP is a fine program to save sprites ....... on your PC at home. But on the net it takes allot of time to load and - perhaps most importantly if you're on a free server - it eats bandwidth like candy. Meaning most everyone will bee a tiny red "X" where your sprite is supposed to be. PGN - actually, PGN is alright. I mean, GIF is smaller, but whatever. I don't have any real problems with PGN.
Type #1 - the recolour (or in scientific terms, "Newbius Lamoes")
![]() The easiest to do, and the least respected of all sprites is known as the recolour. It is commonly followed by statements such as "Do not take my totally original sprite or I will hack you!" A common name for the recolour is "ZeroXmyspritesucksassandiknowitFusha". you should rely on, what most people like to think of, as the superior human brain to solve the mystery on how I recoloured Zero up there. If you cannot grasp the basic concept of a recolouration and how to do it from the picture above, you just will not get spriting. Period. But I'll still go into it anyway.
The easiest to do, and the least respected of all sprites is known as the recolour. It is commonly followed by statements such as "Do not take my totally original sprite or I will hack you!" A common name for the recolour is "ZeroXmyspritesucksassandiknowitFusha". you should rely on, what most people like to think of, as the superior human brain to solve the mystery on how I recoloured Zero up there. If you cannot grasp the basic concept of a recolouration and how to do it from the picture above, you just will not get spriting. Period. But I'll still go into it anyway.
This chapter marks my disillusionment in human intelligence. Really it does. But, with the sheer AMOUNT of people asking for ways to mass recolour something I can only assume you do not know how to use paint. Well, here's some tricks for those of you who are getting started and like to read things.
![]() - Most people use the paint bucket to recolour. This is effective, but a little too crude to be practical. There is an easier way.
- Most people use the paint bucket to recolour. This is effective, but a little too crude to be practical. There is an easier way.
![]() - The eyedropper tool. When you left click on your mouse it selects a colour as seen in this box.
- The eyedropper tool. When you left click on your mouse it selects a colour as seen in this box.
![]() - In this case the selected colour is black. Lets call this the "active colour". When you right click on the eyedropper it selects a colour that goes in the box behind the active one, in this case white. Let's call this the "passive colour".
- In this case the selected colour is black. Lets call this the "active colour". When you right click on the eyedropper it selects a colour that goes in the box behind the active one, in this case white. Let's call this the "passive colour".
![]() - This is where the eraser tool comes in. Left clicking it will always produce the passive colour. In this case white. BUT, if it's another colour. (like red) it will produce another colour. (like red). But this tool is good for recolouring as well, for when you right click it it will replace the active colour. with the passive colour.
- This is where the eraser tool comes in. Left clicking it will always produce the passive colour. In this case white. BUT, if it's another colour. (like red) it will produce another colour. (like red). But this tool is good for recolouring as well, for when you right click it it will replace the active colour. with the passive colour.
Let's look at an example. Let's say you want a blue Zero of your very own. Well, first get all the colours you need by sampling other sprites.
![]() - Use the eyedropper tool and left click the red on Zero to get red in the active colour box. Left click a blue to get blue in the passive colour box. Now, by using the eraser and left clicking all the red bits will be replaced by blue. This will give you a blue Zero. Be sure to do this for every shade of blue you need.
- Use the eyedropper tool and left click the red on Zero to get red in the active colour box. Left click a blue to get blue in the passive colour box. Now, by using the eraser and left clicking all the red bits will be replaced by blue. This will give you a blue Zero. Be sure to do this for every shade of blue you need.
Mass Recolouring
There's ways to recolour every sprite in a sheet, shade by shade, using paint.
1) Get both the sheet you want to recolour and the colours you want to recolour it to. Let's say you want a whole BUNCH of blue Zeros.
2) Make sure they're all on a background that doesn't use a colour that's in the sprite.
3) Right click the eyedropper tool ![]() to select the colour you want to replace (in this case red) and left click with the colour you want to replace it with (in this case, blue).
to select the colour you want to replace (in this case red) and left click with the colour you want to replace it with (in this case, blue). ![]()
4) Go under edit - select all. Then cut. Your background should be the passive colour (in this case red). Use the paint bucket to turn it into the active colour, the colour you want to replace everything with (in this case, blue).
5) ![]() Make sure the screen is scrolled right to the top of the document. Then paste the sheet. Make sure you have the settings set to transparent (so the background is see-through). as seen in the image.
Make sure the screen is scrolled right to the top of the document. Then paste the sheet. Make sure you have the settings set to transparent (so the background is see-through). as seen in the image.
6) The sheet should now have the colour replaced for every sprite. Keep doing this for every shade you want replaced and you should be done in no time.
Recolouring the Adobe way!
If you have Adobe or a program LIKE Adobe, this method of recolouring is for you. First, get the sheet you want and the colours you want to recolour the sheet into. Use the eyedropper to select the colour you want everything to be. Next click on the paint bucket tool. Once there, look up and you'll see options such as "tolerance" and "continuous". Turn tolerance to 1 and uncheck "continuous". Now when you fill in a colour the same shade on the entire sheet will be recoloured.
Resizing
1 - NEVER resize by dragging on the layer! Always use the stretch/skew tool in the images menu. ALWAYS make sure it's by hundreds like 200 or 300 or 400, never by any other number or it'll look weird.
Type #2 - the remake (aka: the Frankenstein)
 Next highest in what I like to call the "sprite hierarchy". The best remakes are those where it is very difficult to tell what sprite was remade. In those cases there is some confusion with the type 3 "totally original" sprite. The lowly remake is where it is obvious to all where the sprite is from, but what truly makes it lowly is when the spriter calls himself the greatest spriter of them all.
The better remakes are made using parts from MANY other sprites to better disguise the base sprites from. Like using the head of Burstman, the torso of Freeman and the legs of Turboman. Next, they must be edited and coloured so they make sense.
People have asked me to elaborate. Hell, why not?
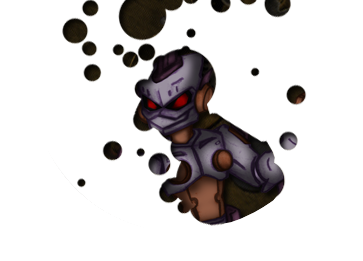
 Step #1 - Pick a pose. Either from a whole sprite, or you can make your own. Whatever. Just have an idea of what you do before you do it. Also have a costume design picked for best results. I picked Bitman for this tutorial.
![]() Step #2 - Gather sprites. The best remakes are made from a few. Whatever makes your pose work. If you do use only one sprite to make your custom, don't expect people to be wowed. At all.
Step #2 - Gather sprites. The best remakes are made from a few. Whatever makes your pose work. If you do use only one sprite to make your custom, don't expect people to be wowed. At all.
![]() Step #3 - Take apart the sprites. Take what you need from all the sprites you've gathered.
Step #3 - Take apart the sprites. Take what you need from all the sprites you've gathered.
 Step #4 - Put it together. Right now your sprite should look like the Frankenstein monster. As long as the proportions and pose make sense, it's all good.
![]() Step #5 - Remake the sprite. Recolour it, fix up the designs, whatever needs to be done. And there ya go, remade sprites. I know I glossed over the recolouring and editing phase of creating Bitman, but you can probably guess at the little changes and seeing that done step-by-step is of little use in creating a new, original sprite.
Step #5 - Remake the sprite. Recolour it, fix up the designs, whatever needs to be done. And there ya go, remade sprites. I know I glossed over the recolouring and editing phase of creating Bitman, but you can probably guess at the little changes and seeing that done step-by-step is of little use in creating a new, original sprite.
Remember, you'll only get good if you PRACTICE. Bitman up there ain't all that super, but he's allot better than all of the remakes of Megaman with Zero's head on them! If I put actual effort into making him, he could be pretty good.
Right now I'd like to point out that the vast majority of custom sprites found on the net are of this type. And it is very important to remember that no matter how much the base might looks like, say Protoman, you must NEVER EVER USE SOMEONE ELSE'S CUSTOM SPRITE TO CREATE YOUR OWN. It's not done. If you think it looks like the official sprite so much then USE the official sprite. Don't screw with fellow MM (or whatever your into) fans because they are just like yourself.
Type #3 - the totally original
The totally original is the most respected and most rare of all customs. When you do it, it must be totally original i.e.: drawn by yerself. A semi-original sprite (i.e.:uses a minority of parts from a per-existing sprite) is still regarded a remake. While it is well respected, the semi-original is NOT a totally original, even if the base is unrecognizable.
 Step #1 - draw your sprite. I like to draw my sprites by hand and then scan them into my computer. Others can simply draw them pixel-by-pixel or using a fancy lazer-pen. If you want to make the "Type 3" sprite, you MUST draw your sprite out using ABSOLUTELY NO taken parts from other sprites. TOTALLY ORIGINAL and all. Try to make the picture you draw as small as you can and as simple as you can. Gauntlet there has a very simple costume and I drew him as small as I possibly could. If you don't draw them small and simply, they will become a huge mess when you scan them in. Details can wait until the end.
 Step #2 - scan in your drawing as a "black and white drawing". If your pitiful scanner does not have this option, you must convert your picture to "2 colours - black and white". That might get tedious, however, as the end result is NOT the same and there is much cleaning up to do. If your drawing this thing pixel-by-pixel step 2 isn't really necessary, as your image will already be on your computer.
 Step #3 - Resize and colour. You're picture will look like garbage, so you'll have to reconstruct it to look better. The best program to use to colour a sprite is MS Paint included in all Windows packages. If you do not have this program, then get an art program and use that. There you go, you're done. I trust you all know how to colour things. Reconstructing your sprite will take time, but follow your picture and look at other sprites to see how they solves similar problems and you'll be good.
At this point I get allot of startled reactions. "Wow! So any one of my pictures can be a sprite!? All I have to do is shrink it down and colour it nicely? Really?" Yes, really. Really, really.Have a look at this.


To the left is a scan of some Capcom art book of sketches for sprites. See, I even show you an animation of Shadowman mirroring these sketches. Yes, totally original sprites are DRAWN. Granted there are varying ways of creating them and my way is not the ONLY way, but make no mistake the sprite creators draw them out on paper first.
Type #4 - the fancy animation.
Alright, after this tutorial was first made I got a lot of questions like "But how do you animate sprites? And what do you use?" At first I refused to answer, but I remember I too had such questions and so here we go. To animate sprites I use an animation program. I, personally, use GIF Construction Set Professional. Now, this is not a program tutorial, but I WILL show you how to get started making yer own animations. For teaching purposes, I'll be using this animation I made of Hardman.
 Step #1 - get your sprites. Make sure they are in sequence and flow right, or your animation will look choppy.
 Step #2 - put sprites on a background colour NOT found in the sprites. This is to make them transparent.
 Step #4 - cut out the sprites. Remember, they WILL be ANIMATED, so remember to leave room for them to move. Make sure you line them up (feet usually, but if the sprite moves up and down line up with the head). This is very important because you don't want yer sprite moving all over the box when yer done.
Step #5 - save the sprites as individual files. I dunno if this is necessary for other programs, but GIF Construction Set requires it.
Step #6 - Pop yer sprites in yer program. GIF Construction Set uses a little magic wand tool. Another program will probably use something else. Put them in the sequence you want them to move.
![]() Step #7 - select your transparent BG. Annnnnnnnnnd your done! Some fine-tuning may need to be done, but you've got the basics down.
Step #7 - select your transparent BG. Annnnnnnnnnd your done! Some fine-tuning may need to be done, but you've got the basics down.
Things to look out for:
![]() Gift animation made by Ryan Quick out of Stoneman's sprites. Not cutting your work up, but it does make a good example of commonly made mistakes.
Gift animation made by Ryan Quick out of Stoneman's sprites. Not cutting your work up, but it does make a good example of commonly made mistakes.
Jumping. It means you have not aligned the feet or head or whatever correctly. See how Gauntlet jumps right before he walks? What Ryan should have done was set his feet firmly on the ground to prevent that sort of thing and aligned the walking motion to where the head is to keep it steady (which he actually did alright).
Speed: Right now that sprite moves much too slowly. Gauntlet needs to speed up and it's really allot of trial and error to get the speed right but I like 30 milliseconds most times. In more complicated animations faster motion means that the animation may appear more fluid, or......
Frames: Sometimes animations simply need a lot of frame to look right. Especially 32-bit ones. Don't singe on adding more frames! Just keep the seconds fast and consistent and your animation will look good!
Knowing when to stop: Have a long pause between animation loops. For instance, take Zero slashing. A NEW spriter would have Zero slash immediately and never have him stop. A veteran spriter would have a few breathing motions, then the slashing, followed by more breathing. Animations are gimmicky little things that get annoying very quickly so long pauses between the big action are appreciated. That said, Hardman could stand to use a longer pause between motions, but he was among my first animations while I was young and foolish.
"So, what does 32-bit Actually MEAN, Anyway??"
Lord Typhon is a first-class smarty pants and wrote a long rant on what "16-bit" and "8-bit" sprites really are. And here it is for sake of completeness:
 There is no existing program to save sprites as 32-bit, because sprites are not actually 32-bit. The term "32-bit" refers to the GAME rather than the SPRITE. It refers to the total palette for the game. In the case of 32-bit, the palette can contain FOUR BILLION different colours.
Sprites can be saved as 24-bit BMPs or TIFs. JPGs are also 24-bit, but suffer from a distinct loss of colour information. 24-bit graphics have a palette of 16.4 million colours.
Sprites SHOULD be saved as 8-bit GIFs. GIFs have a palette of a mere 256 colours, but that is more than enough for any reasonably sized sprite, and lose no colour information whatsoever.
When a sprite is referred to as "32-bit", it means "in the style of the sprites from a 32-bit Mega Man game" and it applies in that sense ONLY in reference to Megaman sprites, which have DISTINCT style changes unique to each game system, or sprites from similar multi-platform sprite-based games.
The Spriter's Code
Yep, there is a code. And it will be spelled out here.
1. Do not claim to be a great spriter. - You will only seems arrogant. People WILL actively try to find many things wrong with your sprite and you will not earn many friends. If you are great, you will not need to say so. Do not say you are great ESPECIALLY if you use remakes or partially-remade sprites. It will not be true.
2. No one can teach you to sprite. - Asking "how do I make great sprites" is a question no one can answer. It involves practice and a trained eye for proportions, colour coordination, and the ability to rotate your sprite in your mind. People can give you pointers, but you must ultimately learn how to be great through endless amounts of practice
3. Never, EVER use someone else's sprite as a base. - This is VERY rude. If you want to seem like a jerk, take a sprite someone has made, remake it and say it is yours. Only use Capcom sprites or sprites from other games to make remakes. Using a fan base (even one that was very obviously modeled after Zero or X) will send rabid spriters after you with knives and pitchforks.
4. Accept criticisms with stride. - When you show someone a sprite and they criticize it, take it with stride, please. People criticize to help others to identify problems with their sprite so they can be fixed or avoided entirely in the future. Do not take these as insults. If we insult you, you'll know it. Do not get defensive, we are pointing out things we think are wrong to HELP you, it would be a hindrance to say only nice things.
This was made to address questions people still had, even after the tutorial. And aw~way we go~!
So, where can I get these programs??
- More handholding by me I suppose. To make this guide a bit more complete, I've added a few animation program links.
GIF Construction Set Professional
Animagic Courtesy of Gringo
What program do I use to make sprites?
- What kinda question is that!? A PAINT PROGRAM! Any paint program will do! I use MS Paint. You can use Mario Paint. Important thing is - ANY PAINT PROGRAM.
So, how do I make the transparent background?
- Depends on the program you use. This is a sprite tutorial, not a program tutorial.
For the Type 3 (totally original) sprite: what if I don't have a scanner?
- What does it say to do? Draw it with yer damn mouse!
How do I create a sprite sheet?
- First you rip the sprites you need using an emulator. If it's possible, turn off all background layers so you'll end up with a nice colour instead of a background. Next you open up the document in Paint (or something similar). Then you use the paint bucket to eliminate the background. Then you put the sprite into a large, blank document. Repeat these steps for every one of the screen shots you took and you'll end up with a sprite sheet.
Isn't this tutorial kind of small?
-I hear this sometimes. Frankly, I think actually having a tutorial on how to make sprites is really ridiculous. I mean, common! Their tiny people, how do you think their made!? The rest is practice. If you want something long that'll go into how to make yer sprite breath or run and that goes into all the idiosyncrasies of recolouration, then there are other sprite tutorials being designed for that (even as I type this). Far be it for someone to use logic and say "base the pose off an existing running sprite and make your character do the same moves". No, someone HAS to use examples and long explanations for something that just needs a little thought. Reading pages long tutorials WILL NOT HELP YOU. And so, I think my tutorial is long enough, however I'll add to it as I see fit.
For more info, if you need it, go to Just Kim's Tutorial (hosted by this site). It deals with high shading and contrast, if you really need everything outlined for you. And that's about it. Friendly tips from the ever trustworthy ninja, Shadowman!